Photos Library Mac File Name
By default, iPhoto is a photo management program which comes standard on every Mac computer. But if you want change your Mac computer to Windows PC, then you need to transfer you all data from Mac to Windows PC. The most important thing is your photos and videos. You can transfer all your photos from iPhoto to Windows with simple steps. To do so, open 'iPhoto' on your Mac and select all your photos to transfer. Click 'File' menu and select 'Export' option. A 'File Export' window opens up. Select 'Original' option in 'Kind' and 'Event Name' option in the 'Subfolder Format' and then click 'Export' button. This will give you the photos in folder which represents the 'Events' in your iPhoto Library. Now you must export the entire event to Windows PC. Go to 'Events' view and select the event which you want to export. You may have to export all photos by year to make file management easier on the Windows PC. Make sure that you have enough storage space on your hard drive before doing this procedure. If you don't have enough storage space, then hust export a few albums from iPhoto and then delete them. If you choose 'Original' in 'File Type', iPhoto will not embed the keywords and GPS data in your exported photos.
Quick Tip to ensure your Photos never go missing
Photos are precious memories and all of us never want to ever lose them to hard disk crashes or missing drives. PicBackMan is the easiest and simplest way to keep your photos safely backed up in one or more online accounts. Simply download PicBackMan (it's free!), register your account, connect to your online store and tell PicBackMan where your photos are - PicBackMan does the rest, automatically. It bulk uploads all photos and keeps looking for new ones and uploads those too. You don't have to ever touch it.
Jul 12, 2017 To move our Photos Library, we drag it to its new location, double-click it, and the Photos app will now point to it. So, that was pretty easy. We’ll next show you how to create a completely new System Photo Library. Creating a New System Photo Library. There are any number of reasons you might want to create a new system library in Photos. 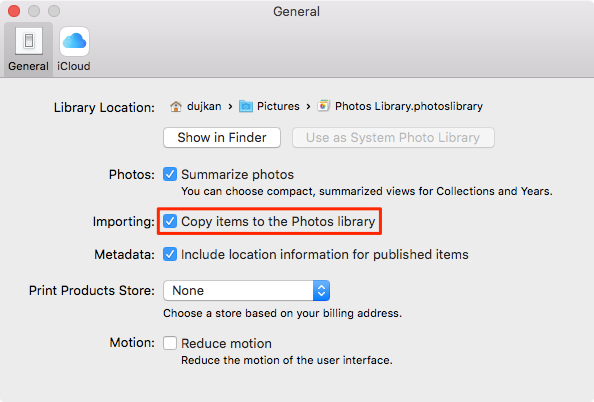 Nov 09, 2018 There is a safer and easy way to transfer your entire photo library from your Mac to your external drive. The best of this trick is whenever you need to see your photos on your Mac you just need to open photo library app on your Mac it will automatically take you to your saved photos in external hard drive until unless it is plugged in. Mar 18, 2020 Your Photos library holds all your photos, albums, slideshows, and print projects. If your library is large, and you want to free up storage space on your Mac, turn on iCloud Photo Library and use Optimize Mac Storage, or move your library to an external drive. Before you start, be sure to back up your library. If the disk needs to be reformatted, you will need to Erase the disk, so make sure you copy anything from the disk first, then click on Erase and choose Mac OS Extended (Journaled).
Photos Library Mac File Names
Jan 12, 2020 You can access the hidden Library folder without using Terminal, which has the side effect of revealing every hidden file on your Mac. This method will only make the Library folder visible, and only for as long as you keep the Finder window for the Library folder open. Mar 27, 2017 Photos in Photos are not just files, they are represented in a distributed way: the original image file, and many linked database entries, plus auxiliary files, thumbnails, faces, etc. And if you are using iCloud Photo Library, a part of this will not even be on your Mac.
Mar 18, 2020 Your Photos library holds all your photos, albums, slideshows, and print projects. If your library is large, and you want to free up storage space on your Mac, turn on iCloud Photo Library and use Optimize Mac Storage, or move your library to an external drive. Before you start, be sure to back up your library. Mac copy image.


Mac Photo Library Management
Look in the General section, where it says Library Location: Now, click on Show in Finder. This will open a Finder window with your current Mac Photos library highlighted.NOTE: Your Mac Photos library will almost certainly be called something else; we changed the name of the file for the purposes of this tutorial.